5. Kits Reference
In this section, we cover kits, integrations with various data science libraries and infrastructure provided by Data Workspaces.
Jupyter
Integration with Jupyter notebooks. This module provides a
LineageBuilder subclass to simplify Lineage for Notebooks.
It also provides a collection of IPython magics (macros) for working in Jupyter notebooks.
- class dataworkspaces.kits.jupyter.NotebookLineageBuilder(results_dir: str, step_name: Optional[str] = None, run_description: Optional[str] = None)[source]
Notebooks are the final step in a pipeline (and potentially the only step). We customize the standard lineage builder to get the step name from the notebook’s name and to always have a results directory.
If you are not running this notebook in a server context (e.g. via nbconvert), the step name won’t be available. In that case, you can explicitly pass in the step name to the constructor.
- dataworkspaces.kits.jupyter.get_step_name_for_notebook() Optional[str][source]
Get the step name for a notebook by getting the path and then extracting the base name. In some situations (e.g. running on the command line via nbconvert), the notebook name is not available. We return None in those cases.
- dataworkspaces.kits.jupyter.is_notebook() bool[source]
Return true if this code is running in a notebook.
Magics
This module also provides a collection of IPython magics (macros) to simplify interactions with your data workspace when develping in a Jupyter Notebook.
Limitations
Currently these magics are only supported in interactive Jupyter Notebooks. They do not run properly
within JupyterLab (we are currently working on an extension specific to JupyterLab),
the nbconvert command, or if you run the entire notebook with “Run All Cells”.
To develop a notebook interactively using the DWS magic commands and then run the same notebook
in batch mode, you can set the variable DWS_MAGIC_DISABLE in your notebook, ahead of the
call to load the magics (%load_ext). If you set it to True, the commands will be
loaded in a disabled state and will run with no effect. Setting DWS_MAGIC_DISABLE to
False will load the magics in the enabled state and run all commands normally.
Loading the magics
To load the magics, run the following in an interactive cell of your Jupyter Notebook:
import dataworkspaces.kits.jupyter
%load_ext dataworkspaces.kits.jupyter
If the load runs correctly, you should see output like this in your cell:
Ran DWS initialization. The following magic commands have been added to your notebook:
%dws_info- print information about your dws environment
%dws_history- print a history of snapshots in this workspace
%dws_snapshot- save and create a new snapshot
%dws_lineage_table- show a table of lineage for the workspace resources
%dws_lineage_graph- show a graph of lineage for a resource
%dws_results- show results from a run (results.json file)Run any command with the
--helpoption to see a list of options for that command. The variableDWS_JUPYTER_NOTEBOOKhas been added to your variables, for use in future DWS calls.If you want to disable the DWS magic commands (e.g. when running in a batch context), set the variable
DWS_MAGIC_DISABLEtoTrueahead of the%load_extcall.
Magic Command reference
We now describe the command options for the individual magics.
%dws_info
usage: dws_info [-h]
Print some information about this workspace
- optional arguments:
- -h, --help
show this help message and exit
%dws_history
Print a history of snapshots in this workspace
- optional arguments:
- -h, --help
show this help message and exit
- --max-count MAX_COUNT
Maximum number of snapshots to show
- --tail
Just show the last 10 entries in reverse order
- --baseline TAG_OR_HASH
Snapshot tag or hash to use as a basis for metrics comparison.
- --heatmap
Show a heatmap for metrics columns
- --maximize-metrics METRICS
Metrics where larger values are better (e.g. accuracy)
- --minimize-metrics METRICS
Metrics where smaller values are better (e.g. loss)
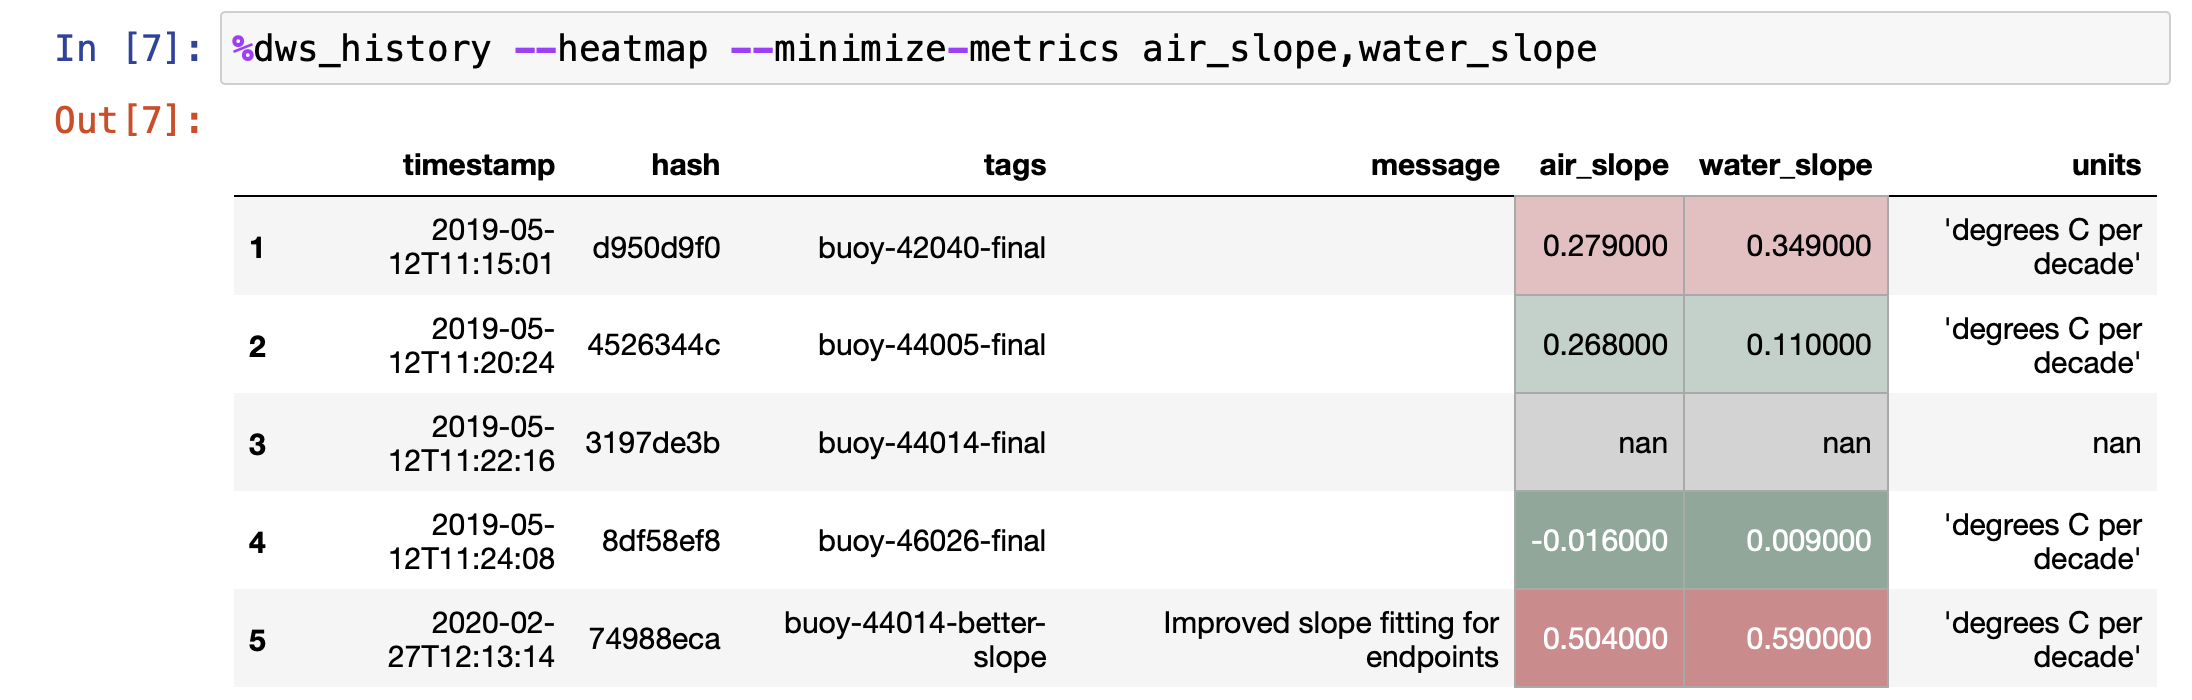
For easy visualization of results, the %dws_history command
supports two styles of color coding. The
--heatmap option will color code the background of metrics cells from dark red
(worst results) to dark green (best results). For common metrics, like accuracy and loss,
DWS knows the directionality of the metric (higher is better vs. lower is better). For less
common or custom metrics, you can use the --maximize-metrics and --minimize-metrics
options to specify this. Here is an example heatmap:
The second style of coloring takes a baseline snapshot. Any metric values better than the
baseline have their text colored green, any metric values close to the baseline are bold
black text, and any metric values worse than the baseline are colored red. The
--baseline=SNAPSHOT option enables this display mode. Here is an example:

%dws_snapshot
usage: dws_snapshot [-h] [-m MESSAGE] [-t TAG]
Save the notebook and create a new snapshot
- optional arguments:
- -h, --help
show this help message and exit
- -m MESSAGE, --message MESSAGE
Message describing the snapshot
- -t TAG, --tag TAG
Tag for the snapshot. Note that a given tag can only be used once (without deleting the old one).
%dws_lineage_table
usage: dws_lineage_table [-h] [–snapshot SNAPSHOT]
Show a table of lineage for the workspace’s resources
- optional arguments:
- -h, --help
show this help message and exit
- --snapshot SNAPSHOT
If specified, print lineage as of the specified snapshot hash or tag
%dws_lineage_graph
usage: dws_lineage_table [-h] [–resource RESOURCE] [–snapshot SNAPSHOT]
Show a graph of lineage for a resource
- optional arguments:
- -h, --help
show this help message and exit
- --resource RESOURCE
Graph lineage from this resource. Defaults to the results resource. Error if not specified and there is more than one.
- --snapshot SNAPSHOT
If specified, graph lineage as of the specified snapshot hash or tag
%dws_results
usage: dws_results [-h] [–resource RESOURCE] [–snapshot SNAPSHOT]
Show results from a run (results.json file)
- optional arguments:
- -h, --help
show this help message and exit
- --resource RESOURCE
Look for the results.json file in this resource. Otherwise, will look in all results resources and return the first match.
- --snapshot SNAPSHOT
If specified, get results as of the specified snapshot or tag. Otherwise, looks at current workspace and then most recent snapshot.
Scikit-learn
This module (dataworkspaces.kits.scikit_learn)
provides integration with the scikit-learn
framework. The main class provided here is LineagePredictor,
which wraps any class following sklearn’s predictor protocol. It captures
inputs, model parameters and results. This module also provides
Metrics and its subclasses, which
support the computation of common metrics and the writing of them
to a results file. Finally, there is
train_and_predict_with_cv(), which
runs a common sklearn classification workflow, including grid search.
- class dataworkspaces.kits.scikit_learn.BinaryClassificationMetrics(expected, predicted, sample_weight=None)[source]
Given an array of expected (target) values and the actual predicted values from a classifier, compute metrics that make sense for a binary classifier, including accuracy, precision, recall, roc auc, and f1 score.
- class dataworkspaces.kits.scikit_learn.LineagePredictor(predictor, metrics: Union[str, type], input_resource: Union[str, dataworkspaces.utils.lineage_utils.ResourceRef], results_resource: Optional[Union[str, dataworkspaces.utils.lineage_utils.ResourceRef]] = None, model_save_file: Optional[str] = None, workspace_dir: Optional[str] = None, verbose: bool = False)[source]
This is a wrapper for adding lineage to any predictor in sklearn. To use it, instantiate the predictor (for classification or regression) and then create a new instance of
LineagePredictor.The initializer finds the associated workspace and initializes a
Lineageinstance. The input_resource is recorded in this lineage. Other methods call the underlying wrapped predictor’s methods, with additional functionality as needed (see below).Parameters
- predictor
Any sklearn predictor instance. It must have
fitandpredictmethods.- metrics
Either a string naming a metrics type or a subclass of
Metrics. If a string, it should be one of: binary_classification, multiclass_classification, or regression.- input_resource
Resource providing the input data to this model. May be specified by name, by a local file path, or via a
ResourceRef.- resource_resource
(optional) Resource where the results are to be stored. May be specified by name, by a local file path, or via a
ResourceRef. If not specified, will try to infer from the workspace.- model_save_file
(optional) Name of file to store a (joblib-formmatted) serialization of the trained model upon completion of the
fit()method. This should be a relative path, as it is stored under the results resource. If model_save_file is not specified, no model is saved.- workspace_dir
(optional) Directory specifying the workspace. Usually can be inferred from the current directory.
- verbose
If True, print a lot of detailed information about the execution of Data Workspaces.
Example
Here is an example useage of the wrapper, taken from the Quick Start:
from sklearn.svm import SVC
from sklearn.model_selection import train_test_split
from dataworkspaces.kits.scikit_learn import load_dataset_from_resource
from dataworkspaces.kits.scikit_learn import LineagePredictor

dataset = load_dataset_from_resource('sklearn-digits-dataset')
X_train, X_test, y_train, y_test = train_test_split(
    dataset.data, dataset.target, test_size=0.5, shuffle=False)
classifier = LineagePredictor(SVC(gamma=0.001),
                              metrics='multiclass_classification',
                              input_resource=dataset.resource,
                              model_save_file='digits.joblib')

classifier.fit(X_train, y_train)
score = classifier.score(X_test, y_test)
Methods
- fit(X, y, *args, **kwargs)[source]
The underlying fit() method of a predictor trains the predictio based on the input data (X) and labels (y).
If the input resource is an api resource, the wrapper captures the hash of the inputs. If
model_save_filewas specified, it also saves the trained model.
- predict(X)[source]
The underlying
predict()method is called directly, without affecting the lineage.
- score(X, y, sample_weight=None)[source]
This method make predictions from a trained model and scores them according to the metrics specified when instantiated the wrapper.
If the input resource is an api resource, the wrapper captures its hash. The wapper runs the wrapped predictor’s
predict()method to generate predictions. A metrics object is instantiated to compute the metrics for the predictions and aresults.jsonfile is written to the results resource. The lineage data is saved and finally the score is computed from the predictions and returned to the caller.
- class dataworkspaces.kits.scikit_learn.Metrics(expected, predicted, sample_weight=None)[source]
Metrics and its subclasses are convenience classes for sklearn metrics. The subclasses of Matrics are used by
train_and_predict_with_cv()in printing a metrics report and generating the metrics json file.
- class dataworkspaces.kits.scikit_learn.MulticlassClassificationMetrics(expected, predicted, sample_weight=None)[source]
Given an array of expected (target) values and the actual predicted values from a classifier, compute metrics that make sense for a multi-class classifier, including accuracy and sklearn’s “classification report” showing per-class metrics.
- dataworkspaces.kits.scikit_learn.load_dataset_from_resource(resource_name: str, subpath: Optional[str] = None, workspace_dir: Optional[str] = None) sklearn.utils.Bunch[source]
Load a datset (data and targets) from the specified resource, and returns an sklearn-style Bunch (a dictionary-like object). The bunch will include at least three attributes:
data- a NumPy array of shape number_samples * number_featurestarget- a NumPy array of length number_samplesresource- aResourceRefthat provides the resource name and subpath (if any) for the data
Some other attributes that may also be present, depending on the data set:
DESCR- text containing a full description of the data set (for humans)feature_names- an array of length number_features containing the name of each feature.target_names- an array containing the name of each target class
Data sets may define their own attributes as well (see below).
Parameters
- resource_name
The name of the resource containing the dataset.
- subpath
Optional subpath within the resource where this specific dataset is located. If not specified, the root of the resource is used.
- workspace_dir
The root directory of your workspace in the local file system. Usually, this can be left unspecified and inferred by DWS, which will search up from the current working directory.
Creating a Dataset
To create a dataset in your resource that is suitable for importing by this function, you simply need to create a file for each attribute you want in the bunch and place all these files in the same directory within your resource. The names of the files should be
ATTRIBUTE.extnwhereATTRIBUTEis the attribute name (e.g.dataorDESCR) and.extnis a file extension indicating the format. Supported file extensions are:.txtor.rst- text files.csv- csv files. These are read in usingnumpy.loadtxt(). If this fails because the csv does not contain all numeric data, pandas is used to read in the file. It is then converted back to a numpy array..csv.gzor.csv.bz2- these are compressed csv files which are treated the same was as csv files (numpy and pandas will automatically uncompress before parsing)..npy- this a a file containing a serialized NumPy array saved vianumpy.save(). It is loaded usingnumpy.load().
TensorFlow
Integration with Tensorflow 1.x and 2.0
This is an experimental API and subject to change.
Wrapping a Karas Model
Below is an example of wrapping one of the standard tf.keras model classes,
based on https://www.tensorflow.org/tutorials/keras/basic_classification.
Assume we have a workspace already set up, with two resources: a Source Data
resource of type api-resource, which is used to capture the hash of
input data as it is passed to the model, and a Results resource to
keep the metrics. The only change we need to do to capture the lineage from
the model is to wrap the model’s class, using
add_lineage_to_keras_model_class().
Here is the code:
# TensorFlow and tf.keras
import tensorflow as tf
from tensorflow import keras

from dataworkspaces.kits.tensorflow1 import add_lineage_to_keras_model_class

# Wrap our model class. This is the only DWS-specific change needed.
# We add an optional checkpoint configuration, which will cause checkpoints
# to be written to the workspace's scratch directory and then the best
# checkpoint copied to the results resource.
keras.Sequential = add_lineage_to_keras_model_class(keras.Sequential,
                       checkpoint_config=CheckpointConfig(model='fashion',
                                                          monitor='loss'))

fashion_mnist = keras.datasets.fashion_mnist

(train_images, train_labels), (test_images, test_labels) = fashion_mnist.load_data()

model = keras.Sequential([
    keras.layers.Flatten(input_shape=(28, 28)),
    keras.layers.Dense(128, activation=tf.nn.relu),
    keras.layers.Dense(10, activation=tf.nn.softmax)
])

model.compile(optimizer='adam',
              loss='sparse_categorical_crossentropy',
              metrics=['accuracy'])

model.fit(train_images, train_labels, epochs=5)

test_loss, test_acc = model.evaluate(test_images, test_labels)
print('Test accuracy:', test_acc)
This will create a results.json file in the results resource. It will
look like this:
{
  "step": "test",
  "start_time": "2019-09-26T11:33:22.100584",
  "execution_time_seconds": 26.991521,
  "parameters": {
    "optimizer": "adam",
    "loss_function": "sparse_categorical_crossentropy",
    "epochs": 5,
    "fit_batch_size": null,
    "evaluate_batch_size": null
  },
  "run_description": null,
  "metrics": {
    "loss": 0.3657455060243607,
    "acc": 0.8727999925613403
  }
}
Subclassing from a Keras Model
If you subclass from a Keras Model class, you can just use
add_lineage_to-keras_model_class() as a decorator. Here is an example:
@add_lineage_to_keras_model_class
class MyModel(keras.Model):
  def __init__(self):
    # The Tensorflow documentation tends to specify the class name
    # when calling the superclass __init__ function. Don't do this --
    # it breaks if you use class decorators!
    #super(MyModel, self).__init__()
    super().__init__()
    self.dense1 = tf.keras.layers.Dense(4, activation=tf.nn.relu)
    self.dense2 = tf.keras.layers.Dense(5, activation=tf.nn.softmax)

  def call(self, inputs):
    x1 = self.dense1(inputs)
    return self.dense2(x1)

model = MyModel()

import numpy as np

model.compile(optimizer='adam',
              loss='sparse_categorical_crossentropy',
              metrics=['accuracy'])
model.fit(np.zeros(20).reshape((5,4)), np.ones(5), epochs=5)
test_loss, test_acc = model.evaluate(np.zeros(16).reshape(4,4), np.ones(4))

print('Test accuracy:', test_acc)
Supported datatypes for API Resources
If you are using the API Resource Type for your input resource, the model wrapper will hash the incoming data parameters and include the hash values in the data lineage. To compute the hashes, Data Workspaces must access the underlying data representation. The following data types are currently supported:
NumPy
ndarrayPandas
DataFrameandSeriesTensorflow
TensorandDataset, as well as tuples and dictionaries containing these types. These types supported if you are either running Tensorflow 2.x (graph or eager mode) or 1.x only in eager mode. This restriction is due to the inability to access the underlying tensor representation when Tensorflow is running in graph mode in version 1.x
If you are using another data representation, or running Tensorflow 1.x in graph mode, you can always use a resource type that stores the data in files (e.g. git or local-files) and pass in the input resource name to the wrapper function.
API
- class dataworkspaces.kits.tensorflow.CheckpointConfig(model_name: str, monitor: str = 'val_loss', save_best_only: bool = False, mode: str = 'auto', save_freq: Union[str, int] = 'epoch')[source]
Configuration for checkpoints, to be passed as a parameter to
add_lineage_to_keras_model_class(), instead of directly instantiatingDwsModelChecpoint.The checkpoints are initially written under the workspace’s scratch space. At the end of training, the best checkpoint is copied to the results resource.
The configuration fields are:
model_name- name of the model to use in checkpoint filesmonitor- metric to monitor - defaults to val_losssave_best_only- if True, only checkpoints better than the previous are kept.mode- how to determine whether a metric is the “best” - auto, min, or maxsave_freq- ‘epoch’ or an interger
- property mode
Alias for field number 3
- property model_name
Alias for field number 0
- property monitor
Alias for field number 1
- property save_best_only
Alias for field number 2
- property save_freq
Alias for field number 4
- class dataworkspaces.kits.tensorflow.DwsModelCheckpoint(*args: Any, **kwargs: Any)[source]
Subclass of tf.keras.callbacks.ModelCheckpoint which will save checkpoints to the workspace’s stratch space and then move the most recent/best checkpoint to the results directory at the end of the run.
You can instantiate this class directly and pass it to the
callbacksparameter of the model’sfit()method:model.fit(train_images, train_labels, epochs=10, callbacks=[DwsModelCheckpoint('fashion', monitor='loss', save_best_only=True)])
You can also pass
CheckpointConfiginstance to theadd_lineage_to_keras_model_class()wrapper function.
- dataworkspaces.kits.tensorflow.add_lineage_to_keras_model_class(Cls: type, input_resource: Optional[Union[str, dataworkspaces.utils.lineage_utils.ResourceRef]] = None, results_resource: Optional[Union[str, dataworkspaces.utils.lineage_utils.ResourceRef]] = None, workspace_dir: Optional[str] = None, checkpoint_config: Optional[dataworkspaces.kits.tensorflow.CheckpointConfig] = None, verbose: bool = False) type[source]
This function wraps a Keras model class with a subclass that overwrites key methods to make calls to the data lineage API.
Parameters:
Cls– the class being wrappedinput_resources– optional list of input resources to this model. Each resource may be specified by name, by a local file path, or via aResourceRef. If no inputs are specified, will try to infer from the workspace.results_resource– optional resource where the results are to be stored. May be specified by name, by a local file path, or via aResourceRef. if not specified, will try to infer from the workspace.workspace-dir– Optional directory specifying the workspace. Usually can be inferred from the current directory.checkpoint_config– Optional instance ofCheckpointConfig, which is used to enable checkpointing on fit and fit_generator()verbose– If True, print extra debugging information.
The following methods are wrapped:
__init__()- loads the workspace and adds dws-specific class memberscompile()- captures theoptimizerandloss_functionparameter valuesfit()- captures theepochsandbatch_sizeparameter values; if input is an API resource, capture hash values of training data, otherwise capture input resource name. If the input is an API resource, and it is either a Keras Sequence or a generator, writes the generator and captures the hashes of returned values as it is iterated through.evaluate()- captures thebatch_sizeparameter value; if input is an API resource, capture hash values of test data, otherwise capture input resource name; capture metrics and write them to results resource. If the input is an API resource, and it is either a Keras Sequence or a generator, writes the generator and captures the hashes of returned values as it is iterated through.