1. Introduction
Quick Start
Here is a quick example to give you a flavor of the project, using scikit-learn and the famous digits dataset running in a Jupyter Notebook.
First, install 1 the libary:
pip install dataworkspaces
Now, we will create a workspace:
mkdir quickstart
cd ./quickstart
dws init --create-resources code,results
This created our workspace (which is a git repository under the covers) and initialized it with two subdirectories, one for the source code, and one for the results. These are special subdirectories, in that they are resources which can be tracked and versioned independently.
- 1
See the Installation section for more options and details.
Now, we are going to add our source data to the workspace. This resides in an external, third-party git repository. It is simple to add:
git clone https://github.com/jfischer/sklearn-digits-dataset.git
dws add git --role=source-data --read-only ./sklearn-digits-dataset
The first line (git clone ...) makes a local copy of the Git repository for the
Digits dataset. The second line (dws add git ...) adds the repository to the workspace
as a resource to be tracked as part of our project. The --role option tells Data Workspaces
how we will use the resource (as source data), and the --read-only option indicates that
we should treat the repository as read-only and never try to push it to its
origin 2
(as you do not have write permissions to the origin copy of this repository).
We can see the list of resources in our workspace via the command dws report status:
$ dws report status
Status for workspace: quickstart
Resources for workspace: quickstart
| Resource               | Role        | Type             | Parameters                                                                |
|________________________|_____________|__________________|___________________________________________________________________________|
| sklearn-digits-dataset | source-data | git              | remote_origin_url=https://github.com/jfischer/sklearn-digits-dataset.git, |
|                        |             |                  | relative_local_path=sklearn-digits-dataset,                               |
|                        |             |                  | branch=master,                                                            |
|                        |             |                  | read_only=True                                                            |
| code                   | code        | git-subdirectory | relative_path=code                                                        |
| results                | results     | git-subdirectory | relative_path=results                                                     |
No resources for the following roles: intermediate-data.
- 2
In Git, each remote copy of a repository is assigned a name. By convention, the
originis the copy from which the local copy was cloned.
Now, we can create a Jupyter notebook for running our experiments:
cd ./code
jupyter notebook
This will bring up the Jupyter app in your brower. Click on the New
dropdown (on the right side) and select “Python 3”. Once in the notebook,
click on the current title (“Untitled”, at the top, next to “Jupyter”)
and change the title to digits-svc.
Now, type the following Python code in the first cell:
from sklearn.svm import SVC
from sklearn.model_selection import train_test_split
from dataworkspaces.kits.scikit_learn import LineagePredictor, load_dataset_from_resource

# load the data from filesystem into a "Bunch"
dataset = load_dataset_from_resource('sklearn-digits-dataset')

# Instantiate a support vector classifier and wrap it for dws
classifier = LineagePredictor(SVC(gamma=0.001),
                              'multiclass_classification',
                              input_resource=dataset.resource,
                              model_save_file='digits.joblib')

# split the training and test data
X_train, X_test, y_train, y_test = train_test_split(
    dataset.data, dataset.target, test_size=0.5, shuffle=False)

# train and score the classifier
classifier.fit(X_train, y_train)
classifier.score(X_test, y_test)
This code is the same as you would write for scikit-learn without dws, except that:
we load the dataset from a resource rather than call the lower-level NumPy fuctions (although you can call those if you prefer), and
we wrap the support vector classifier instance with a
LineagePredictor.
It will take a second to train and run the classifier. In the output of the cell, you should then see:
Wrote results to results:results.json

0.9688542825361512
Now, you can save and shut down your notebook. If you look at the
directory quickstart/results, you should see a saved model file,
digits.joblib, and a results file, results.json,
file with information about your run. We can format and view the results file
with the command dws report results:
$ dws report results
Results file at results:/results.json

General Properties
| Key                    | Value                      |
|________________________|____________________________|
| step                   | digits-svc                 |
| start_time             | 2020-01-14T12:54:00.473892 |
| execution_time_seconds | 0.13                       |
| run_description        | None                       |

Parameters
| Key                     | Value |
|_________________________|_______|
| C                       | 1.0   |
| cache_size              | 200   |
| class_weight            | None  |
| coef0                   | 0.0   |
| decision_function_shape | ovr   |
| degree                  | 3     |
| gamma                   | 0.001 |
| kernel                  | rbf   |
| max_iter                | -1    |
| probability             | False |
| random_state            | None  |
| shrinking               | True  |
| tol                     | 0.001 |
| verbose                 | False |

Metrics
| Key      | Value |
|__________|_______|
| accuracy | 0.969 |

Metrics: classification_report
| Key          | Value                                                                                                 |
|______________|_______________________________________________________________________________________________________|
| 0.0          | precision: 1.0, recall: 0.9886363636363636, f1-score: 0.9942857142857142, support: 88                 |
| 1.0          | precision: 0.9887640449438202, recall: 0.967032967032967, f1-score: 0.9777777777777779, support: 91   |
| 2.0          | precision: 0.9883720930232558, recall: 0.9883720930232558, f1-score: 0.9883720930232558, support: 86  |
| 3.0          | precision: 0.9753086419753086, recall: 0.8681318681318682, f1-score: 0.9186046511627908, support: 91  |
| 4.0          | precision: 0.9887640449438202, recall: 0.9565217391304348, f1-score: 0.9723756906077348, support: 92  |
| 5.0          | precision: 0.946236559139785, recall: 0.967032967032967, f1-score: 0.9565217391304348, support: 91    |
| 6.0          | precision: 0.989010989010989, recall: 0.989010989010989, f1-score: 0.989010989010989, support: 91     |
| 7.0          | precision: 0.9565217391304348, recall: 0.9887640449438202, f1-score: 0.9723756906077348, support: 89  |
| 8.0          | precision: 0.9361702127659575, recall: 1.0, f1-score: 0.967032967032967, support: 88                  |
| 9.0          | precision: 0.9278350515463918, recall: 0.9782608695652174, f1-score: 0.9523809523809524, support: 92  |
| micro avg    | precision: 0.9688542825361512, recall: 0.9688542825361512, f1-score: 0.9688542825361512, support: 899 |
| macro avg    | precision: 0.9696983376479764, recall: 0.9691763901507882, f1-score: 0.9688738265020351, support: 899 |
| weighted avg | precision: 0.9696092010839529, recall: 0.9688542825361512, f1-score: 0.9686644837258652, support: 899 |
Next, let us take a snapshot, which will record the state of the workspace and save the data lineage along with our results:
dws snapshot -m "first run with SVC" SVC-1
SVC-1 is the tag of our snapshot.
If you look in quickstart/results, you will see that the results
(currently just results.json) have been moved to the subdirectory
snapshots/HOSTNAME-SVC-1, where HOSTNAME is the hostname for your
local machine). A file, lineage.json, containing a full
data lineage graph for our experiment has also been
created in that directory.
We can see the history of snapshots with the command dws report history:
$ dws report history

History of snapshots
| Hash    | Tags  | Created             | accuracy | classification_report     | Message            |
|_________|_______|_____________________|__________|___________________________|____________________|
| f1401a8 | SVC-1 | 2020-01-14T13:00:39 |    0.969 | {'0.0': {'precision': 1.. | first run with SVC |
1 snapshots total
We can also see the lineage for this snapshot with the command dws report lineage --snapshot SVC-1:
$ dws report lineage --snapshot SVC-1
Lineage for SVC-1
| Resource               | Type        | Details                                  | Inputs                                 |
|________________________|_____________|__________________________________________|________________________________________|
| results                | Step        | digits-svc at 2020-01-14 12:54:00.473892 | sklearn-digits-dataset (Hash:635b7182) |
| sklearn-digits-dataset | Source Data | Hash:635b7182                            | None                                   |
This report shows us that the results resource was writen by the digits-svc step, which had as its input the resource sklearn-digits-dataset. We also know the specific version of this resource (hash 635b71820) and that it is source data, not written by another step.
Some things you can do from here:
Run more experiments and save their results by snapshotting the workspace. If, at some point, we want to go back to our first experiment, we can run:
dws restore SVC-1. This will restore the state of the source data and code subdirectories, but leave the full history of the results.Upload your workspace on GitHub or an any other Git hosting application. This can be to have a backup copy or to share with others. Others can download it via
dws clone.More complex scenarios involving multi-step data pipelines can easily be automated. See the documentation for details.
See the Tutorial Section for a continuation of this example.
Installation
Now, let us look into more detail at the options for installation.
Prerequisites
This software runs directly on Linux and MacOSx. Windows is supported by via the Windows Subsystem for Linux. The following software should be pre-installed:
git
Python 3.5 or later
Optionally, the rclone utility, if you are going to be using it to sync with a remote copy of your data.
Installation from the Python Package Index (PyPi)
This is the easiest way to install Data Workspaces is via the Python Package Index at http://pypi.org.
We recommend first creating a virtual environment to contain the Data Workspaces software and any other software needed for your project. Using the standard Python 3 distribution, you can create and activate a virtual environment via:
python3 -m venv VIRTUAL_ENVIRONMENT_PATH
source VIRTUAL_ENVIRONMENT_PATH/bin/activate
If you are using the Anaconda distribution of Python 3, you can create and activate a virtual environment via:
conda create --name VIRTUAL_ENVIRONMENT_NAME
conda activate VIRTUAL_ENVIRONMENT_NAME
Now that you have your virtual environment set up, we can install the actual library:
pip install dataworkspaces
To verify that it was installed correctly, run:
dws --help
Installation via the source tree
You can clone the source tree and install it as follows:
git clone git@github.com:data-workspaces/data-workspaces-core.git
cd data-workspaces-python
pip install `pwd`
dws --help # just a sanity check that it was installed correctly
Concepts
Data Workspaces provides a thin layer of the Git version control
system for easy management of source data, intermediate data, and results for
data science projects. A workspace is a Git repository with some added
metadata to track external resources and experiment history. You can create
and manipulate workspaces via dws, a command line tool. There is
also a programmatic API for integrating more tightly with your data
pipeline.
A workspace contains one or more resources. Each resource represents a collection of data that has a particular role in the project – source data, intermediate data (generated by processing the original source data), code, and results. Resources can be subdirectories in the workspace’s Git repository, separate git repositories, local directories, or remote systems (e.g. an S3 bucket or a remote server’s files accessed via ssh).
Once the assets of a data science project have been organized into resources, one can do the work of developing the associated software and running experiments. At any point in time, you can take a snapshot, which captures the current state of all the resources referenced by the workspace. If you want to go back to a prior state of the workspace or even an individual resource, you can restore back to any prior snapshot.
Results resources are handled a little differently than other types: they are always additive. Each snapshot of a results resource takes the current files in the resource and moves it to a snapshot-specific subdirectory. This lets you view and compare the results of all your prior experiments.
You interact with your data workspace through the dws command line tool,
which like Git, has various subcommands for the actions you might take
(e.g. creating a new snapshot, syncing with a remote repository, etc.).
Beyond the basic versioning of your project through snapshots, you can use the Lineage API to track each step of your workflow, including inputs/outputs, parameters, and metrics (accuracy, loss, precision, recall, roc, etc.). This lineage data is saved with your snapshots so you can understand how you arrived at each of your results.
Commmand Line Interface
To run the command line interface, you use the dws command,
which should have been installed into your environment by pip install.
dws operations have the form:
dws [GLOBAL_OPTIONS] COMMAND [COMMAND_OPTIONS] [COMMAND_ARGS]
Just run dws --help for a list of global options and commands.
Commands
Here is a summary of the key commands:
init- initialize a new workspace in the current directoryadd- add a resource (a git repo, a directory, an s3 bucket, etc.) to the current workspacesnapshot- take a snapshot of the current state of the workspacerestore- restore the state to a prior snapshotpublish- associate a workspace with a remote git repository (e.g. on GitHub)push- push a workspace and all resources to their (remote) originspull- pull the workspace and all resources from their (remote) originsclone- clone a workspace and all the associated resources to the local machinereport- various reports about the workspacerun- run a command and capture the lineage. This information is saved in a file for future calls to the same command. (not yet implemented)
See the Command Reference section for a full description of all commands and their options.
Workflow
To put these commands in context, here is a typical workflow for the initial data scientist on a project:
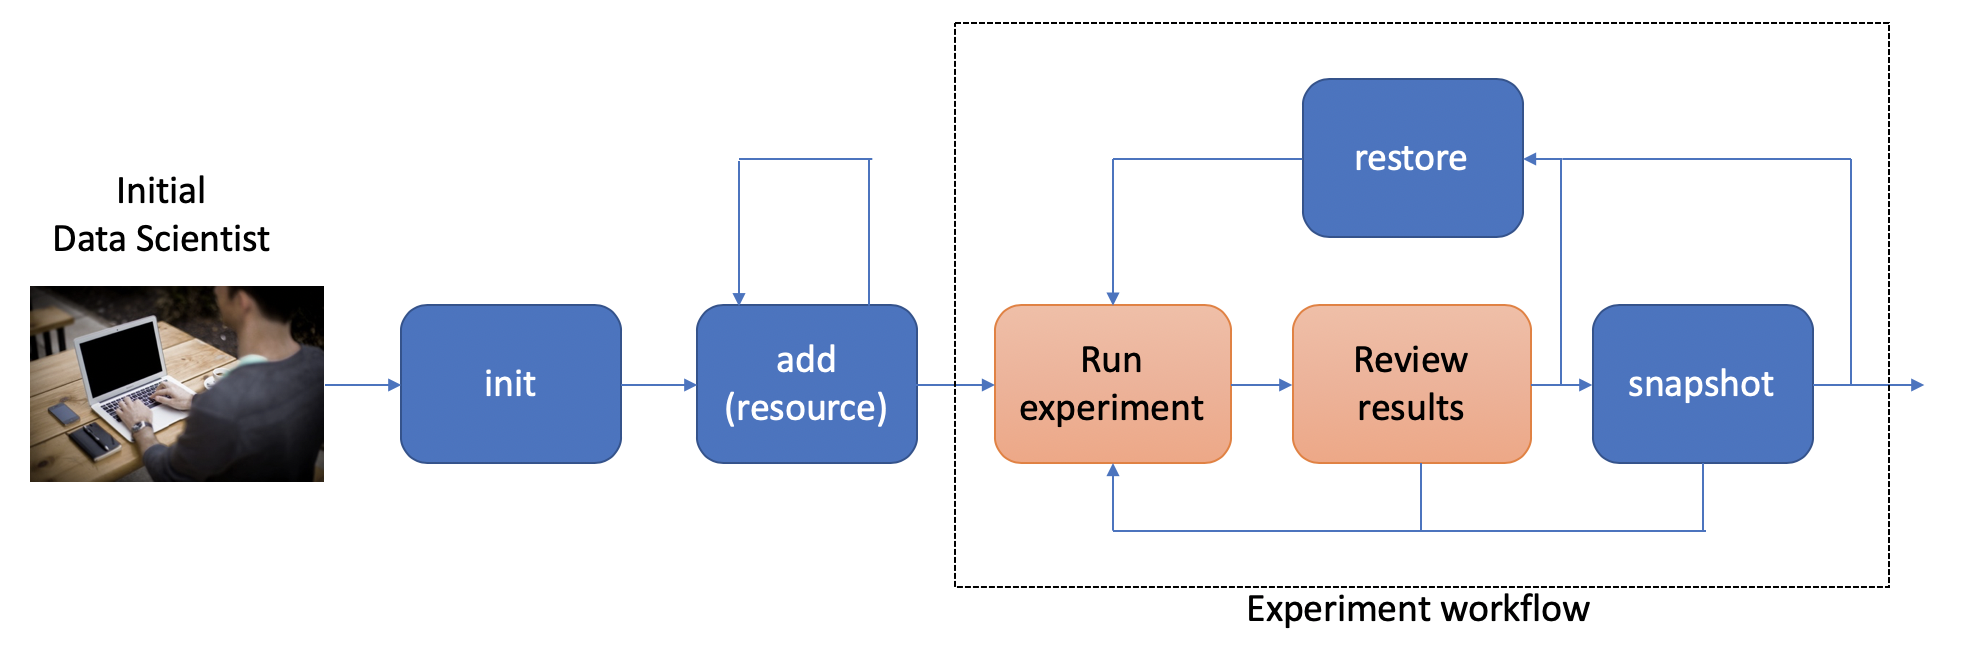
The person starting the project creates a new workspace on their local machine
using the init command. Next, they need to tell the data workspace about
their code, data sets, and places where they will store intermediate data and
results. If subdirectories of the main workspace are sufficient, they
can do this as a part of the init command, using the --create-resources
option. Otherwise, they use the add
command to define each resource associated with their project.
The data scientist can now run their experiements. This is typically an
iterative process, represented in the picture by the dashed box labeled
“Experiment Workflow”. Once they have finished a complete experiment, then can use the
snapshot command to capture the state of their workspace.
They can go back and run further experiments, taking a snapshot each time they
have something interesting. They can also go back to a prior state using the
restore command.
Collaboration
At some point, the data scientist will want to copy their project to a remote service for sharing (and backup). Data Workspaces can use any Git hosting service for this (e.g. GitHub, GitLab, or BitBucket) and does not need any special setup. Here is an overview of collaborations facilitated by Data Workspaces:
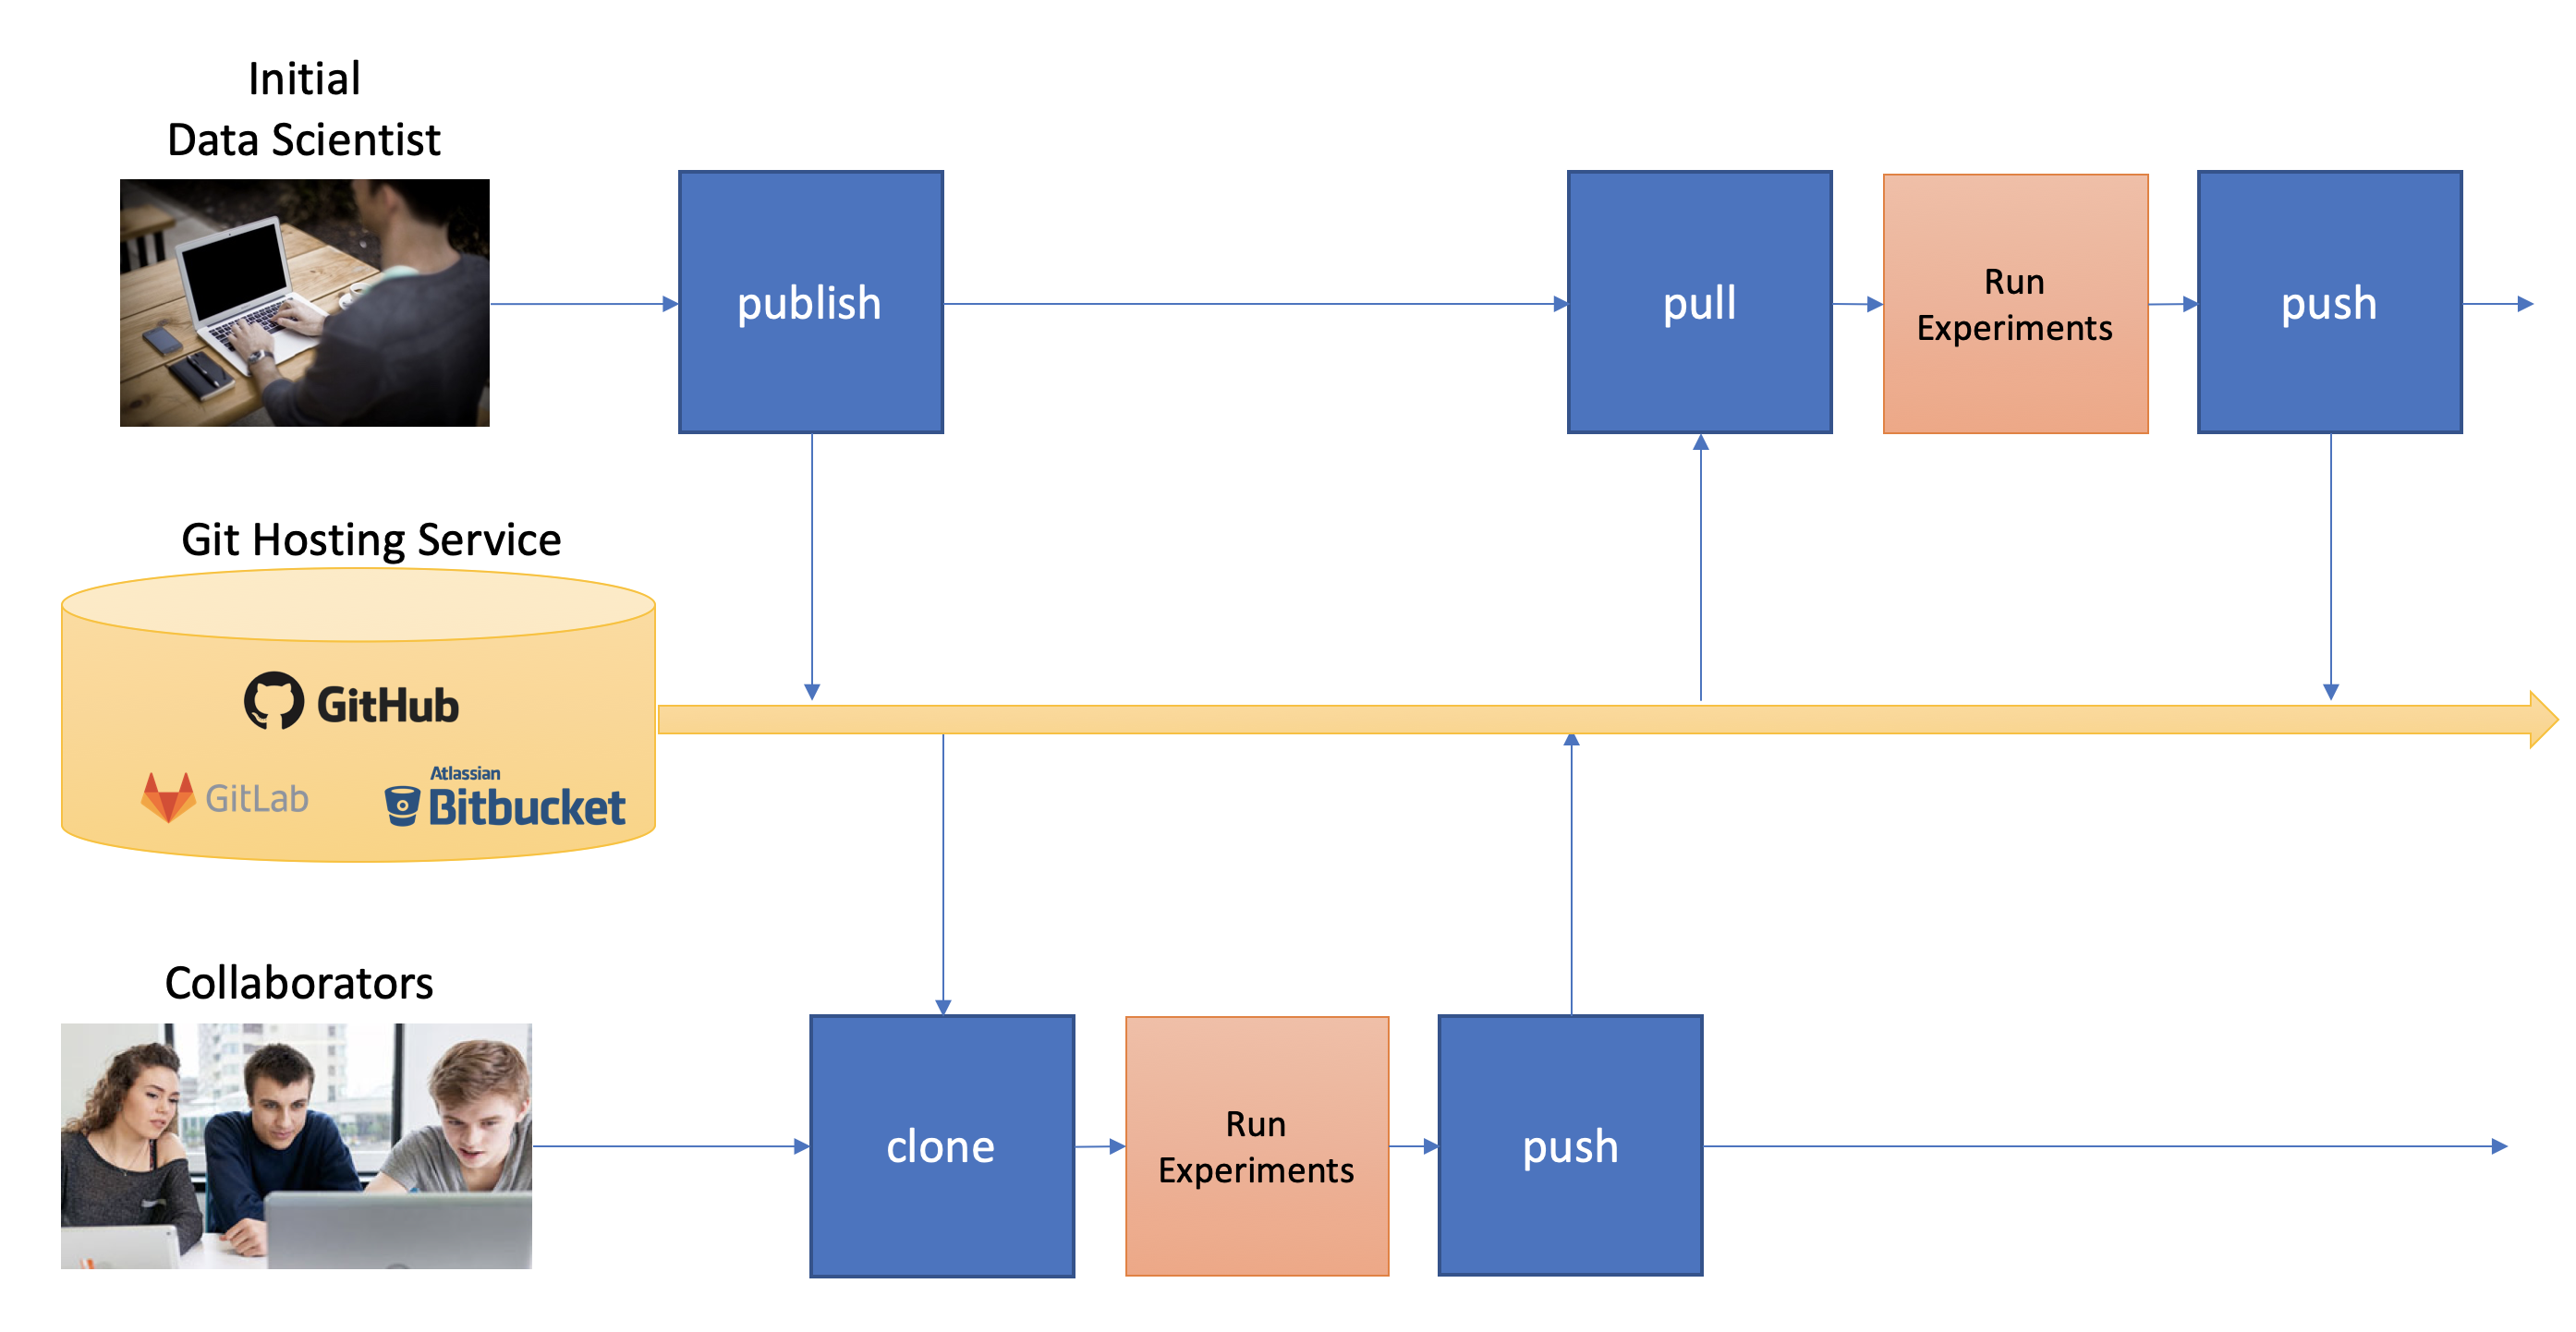
First, the data scientist creates an empty git repository
on the remote origin (e.g. GitHub, GitLab, or BitBucket) and then runs the
publish command to associate the origin with the workspace and update the
origin with the full history of the workspace.
A new collaborator can use the clone command to copy the workspace down to
their local machine. They can then run experiments and take snapshots, just
like the original data scientisst. When readly, then can upload their changes to the via the push command.
Others can then use the pull command to download these changes to their workspace.
This process can be repeated as many times as necessary, and multiple collaborators can overlap
their work.
Sharing lineage across workspaces
In some more complex scenarios, it makes sense to split a data pipeline
across multiple workspaces. For example, an intial sequence of steps may
generate data used across multiple downstream pipelines. As shown in the
picture below, the initial pipeline can be its own self contained workspace.
The intermediate data to be used downstream is then an exported resource. Such
resources save their lineage in the resource itself, in a file named lineage.json.
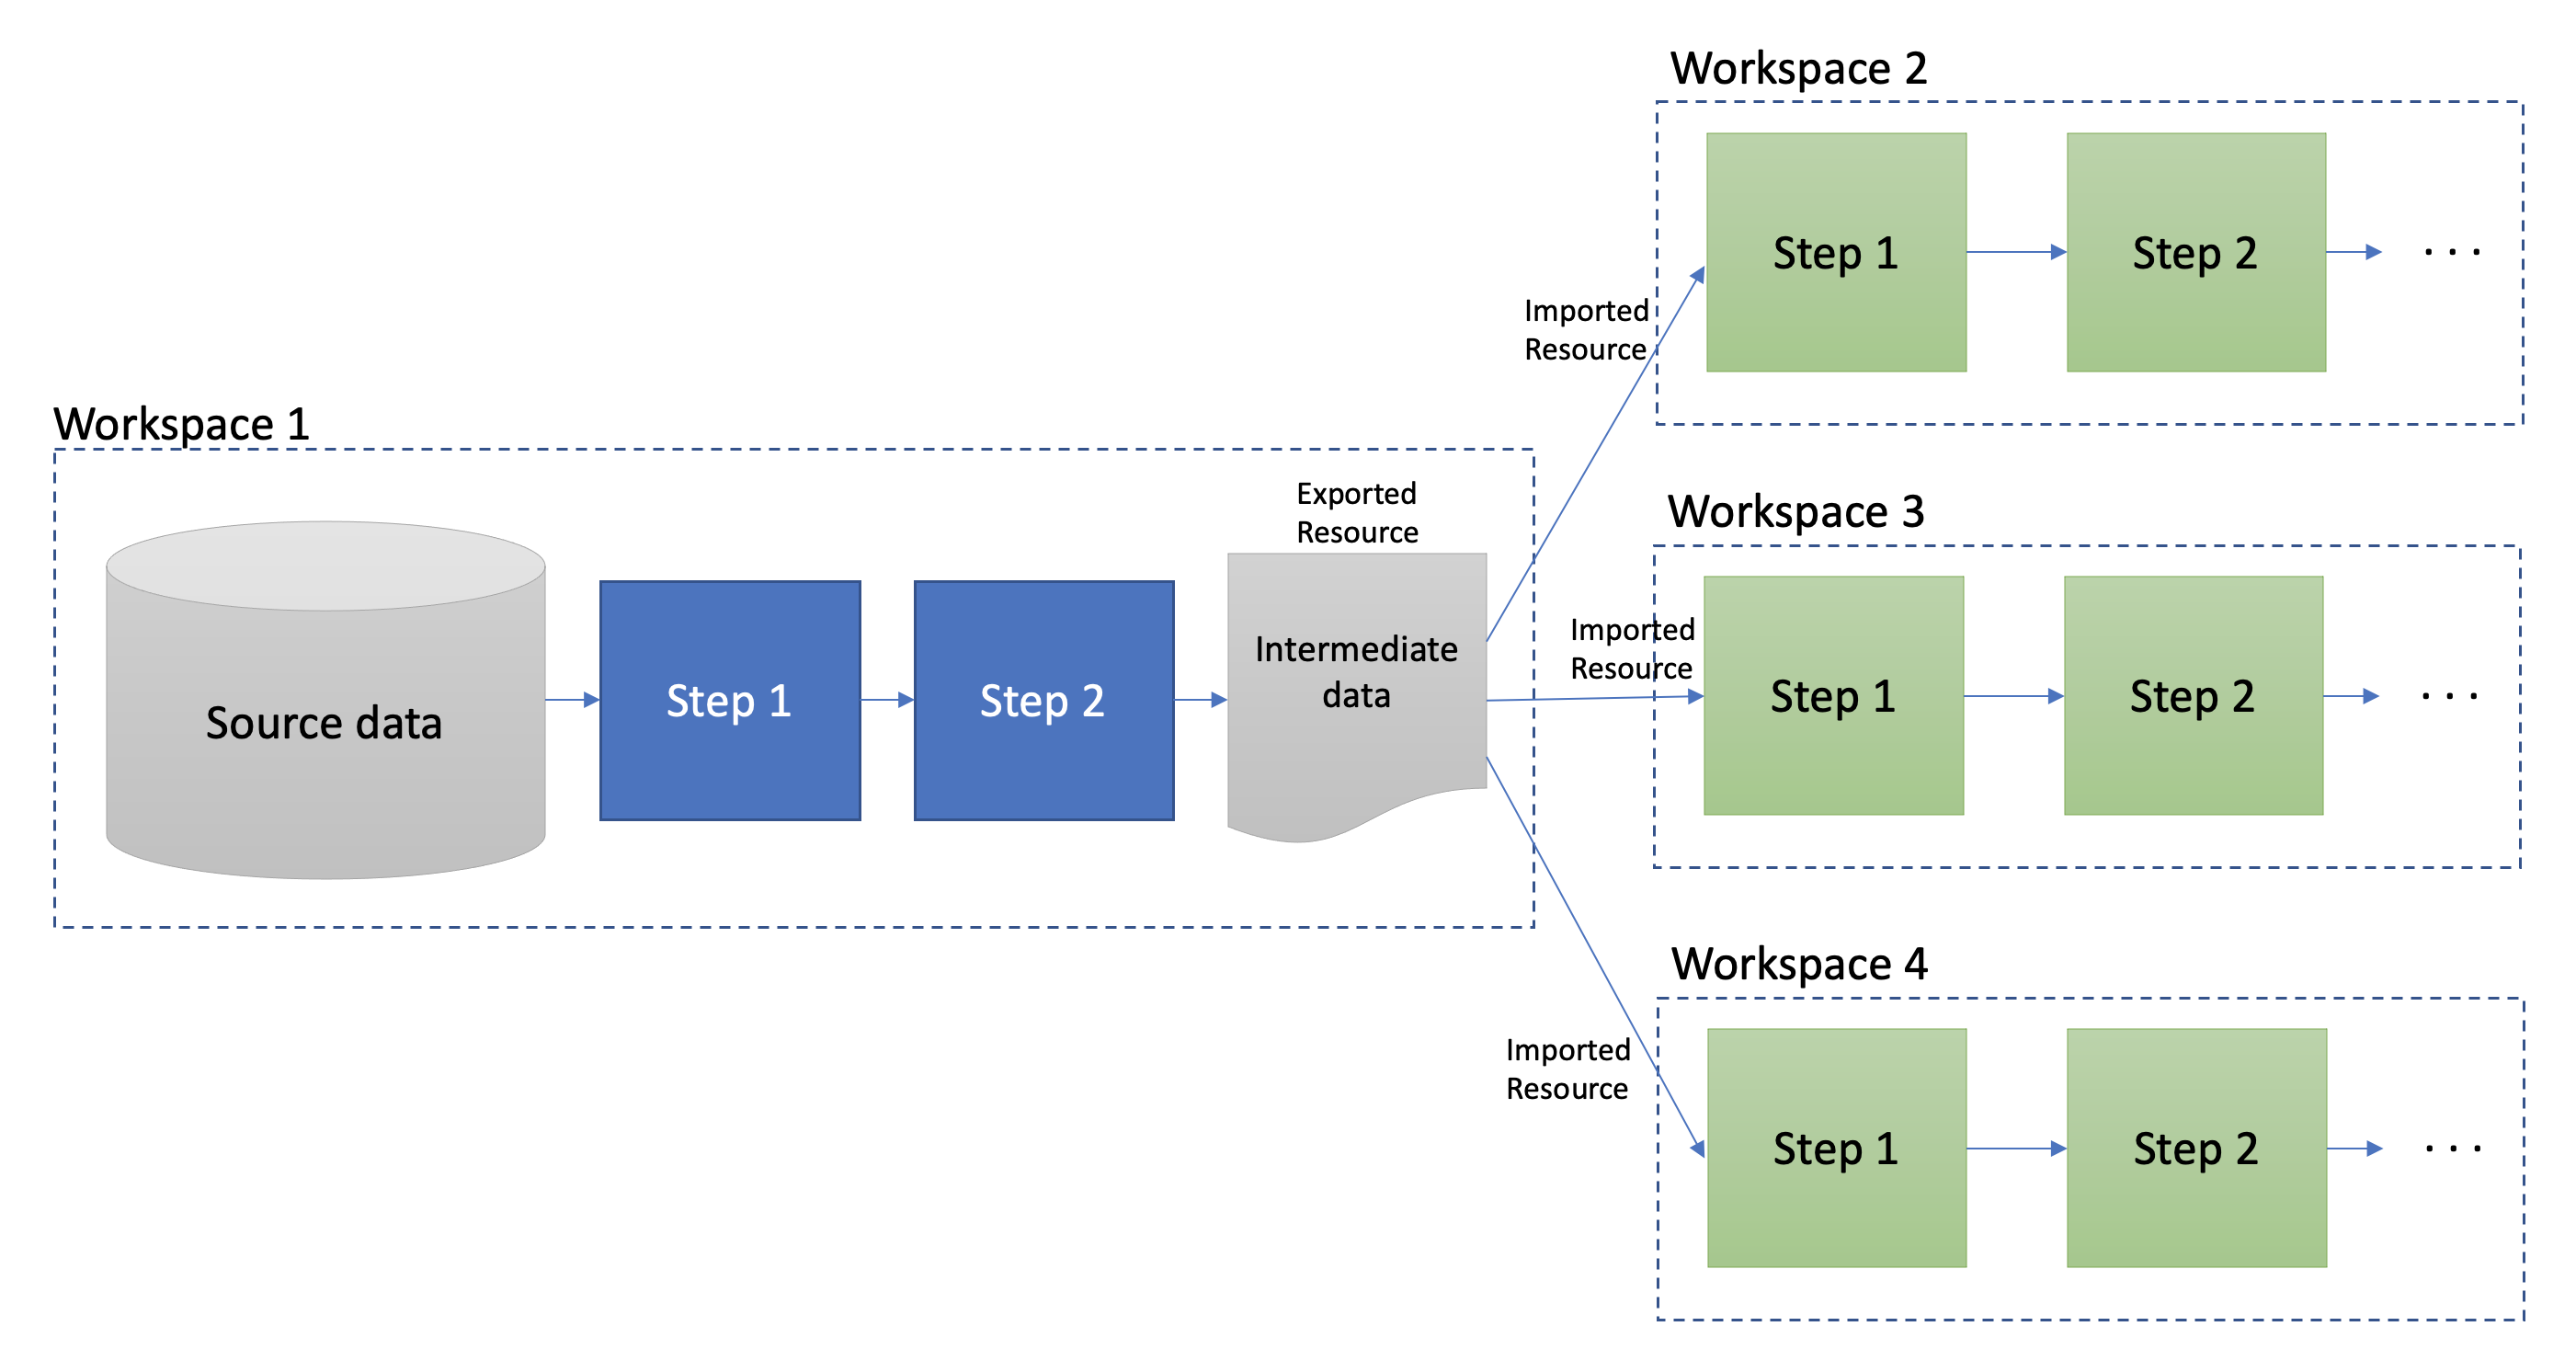
The downstream pipelines can then be separate workspaces that import the resource. This causes the lineage graph of the imported resource to be included in the lineage graph of the importing workspace. Thus, end to end lineage is still captured, even across workspaces.
For more details, see the command reference,
specifically the -export and --import
options of the dws add [resource_type] subcommands.